Showing posts with label Beauty. Show all posts

April 26, 2009

Time to glow - sunless tanning moisturizers compared

I don't go to tanning – the truth is I have never even been in a tanning bed. I don't lay out much, and, much to The Bob's chagrin, when I do it's always after I have dipped myself in SPF 30 (his comment is, "what's the point?"). I'm a fair skinned, blue eyed person, and I don't like getting sunburned. Also I would like my face to stay in decent shape, meaning that time will naturally take its toll - I don't need to speed up the process.

BUT.

But this time of year, when arms and legs start coming out from under layers of clothes for the first time in months, I would prefer my skin not blind people. I would like just a little color to take the edge off.

BUT.

But, for the reasons stated above, I am not going to start tanning. And I am also a complete klutz when it comes to self tanners. That's why, when they came out with the gradual-tanner-slash-moisture lotion, I thought, "woo hoo this is for me." Apply like moisturizer, and a color builds gradually over time.

BUT.

But
the Jergens Natural Glow Firming Daily Moisturizer wasn't doing it for me. I was using the kind for fair skin tones, applying every day as recommended, and maybe maaaaybe saw a tiny bit of color difference. But, the biggest, hugest drawback that eventually became a deal breaker for me was the SMELL. I could not focus on the end goal because I was so self conscious about smelling like self tanner all day long! Boy, I wish perfume could last as long as that stuff did. To be fair, I went on drugstore.com just to see if any reviewers had the same complaint and sure enough, many said the smell of the lotion was just too strong and too "self tanner ish."

THEN.

Then I tried Avon's
SKIN SO SOFT Satin Glow Firming Body Moisturizer. Based on my experience with the Jergens lotion I was doubtful. But since I am now an Avon rep, I want to try as many products as I can, so I can give honest reviews and comparisons. (And, yes, sell good products to people who need them.)

Without a doubt my biggest rave about the Sin So Soft product is that it does not have even the teeniest "self tanner" smell to it. It actually smells GOOD. I put it on in the morning after my shower, and my skin feels very moisturized. I have used it for about a week now and my skin is gradually getting a little darker. I also notice that after using it my skin has a more firm feel, a sensation I can't quite verbalize, but it is noticeable.

Another benefit to
SKIN SO SOFT Satin Glow Firming Body Moisturizer is that it has sun protection built in – SPF 15. Perfect for me for everyday use. The Jergens lotion has no sun protection.

Price-wise, they are comparable. On drugstore.com Jergens Natural Glow Firming Daily Moisturizer is $7.99 for a 7.5 fl. oz. tube. (They are running a special on Jergens products - buy one get one 1/2 off.)

On my Avon site, you can get 8.4 fl. oz. of SKIN SO SOFT Satin Glow Firming Body Moisturizer for $6.99. A larger size for less than the regular price of Jergens. You can read customer reviews of this lotion on my site as well.


So...

If you want a little glow, a little firming, and sun protection all in one great moisturizing lotion, ditch the smelly tanners and try SKIN SO SOFT Satin Glow Firming Body Moisturizer.

April 22, 2009

Product Review: Makeup remover I love for more than one reason.

Now that I am... ahem... of a certain age, it behooves me to treat the skin around my eyes a bit more delicately than I did in the past. So, I have taken to using makeup remover to gently take off my eye shadow and mascara before washing my face.

Ideally, makeup remover will effectively remove the gunk without having to scrub, thereby defeating the purpose. Stinging and burning is not an option. And then, if I could have everything I ever wanted, it would not cost me an arm and a leg.

I have found the product that meets all those criteria. Avon Moisture Effective Eye Makeup Remover Lotion (product #475-800).

It is a lightweight, creamy consistency which at first took me off guard. I was a bit concerned that something that looked like hand lotion would sting or burn. I applied it to a cotton ball and started gently swiping, and low and behold I experienced not one tiny bit of burning in my eyes. It did a great job of removing mascara, liner, and eye makeup. I used one cotton ball, one side for one eye, the other side for the other eye. Then I washed my face as usual. Done and done!

Now for the best news. This stuff is only $4 for a 2 oz. bottle. Compare that to a similar lotion style remover from Clinique, Naturally Gentle Eye Makeup Remover, which sells for $16.50 for a 2.5 oz. container. I don't know about you, but the extra half an ounce is not worth $12.50 to me!


So there you go. Eye makeup remover with a lot to love, for a little bit of money. Give it a try.

To shop for Avon products right now, go to my site any time!


UPDATE 4/24 - this product is now on special for just $.99 a bottle. Stock up!

December 04, 2007

How I learned to stop worrying and love my hair


I start out liking a hairstyle. We date for a while and then I fall in love with it. Eventually the honeymoon is over – it's not doing a thing for me, but I'm stuck with it. Finally, I fall out of love with it and want a divorce. Then I move on to the next hairstyle.

I recently divorced a hairstyle, and moved on to the next one, which got me thinking about how to stop worrying and love my hair. This isn't very scientific, but I thought I would share my strategies for dealing with it.

1. Hair grows in a spiral.
Keeping that in mind helps me realize that no matter how hard I try to create a perfectly symmetrical style, I'm fighting nature. Just let it go.

2. Use your texture to its best advantage.
I just tried the sleek, short bob like Katie Holmes sports, and if I took the time to style it I liked it. When I didn't, I thought it looked horrible and I felt self-conscious. The reason is that my hair has a bit of natural wave to it, so it wants to do its own thing – not Katie's thing. I talked to my stylist about it and we came up with a style that uses my wave to my advantage.

3. No one EVER thinks your hair looks as bad as you do. Even if I think I'm having a bad hair day, other people don't think that much about it. They're busy worrying about their own hair.

4. Don't let your "The Bob" have a vote.
A lot of women will probably have problems with this part. If I let Bob have a vote, my hair would be to my waist in the back. At my height, this would just look silly. In my experience, guys like a women who a.) is confident that she looks good and b.) doesn't spend a lot of time complaining about her hair.

I am not saying that I am not eventually going to leave this hairstyle for another one, but I do know that as the years go by I am learning to stop worrying and love my hair.

May 11, 2007

Finally, a really wearable lip gloss


I am not a lipstick girl. It's not that I don't like the way it looks, I just don't like the maintenance involved. Refreshing my lipstick is a process that requires a mirror so I do not color outside the lines. I tried the long-wearing "paint" type lipstick and that just dried out my lips horribly and in the end it looked like I was suffering from some kind of lip funk. Ug.

However, I am prone to dry lips, so I always have lip balm with me. I apply that about a hundred times a day – no mirror needed. But I get no polished look from Chap Stick. Lip gloss seems like the obvious choice for a girl like me, right? Easier to refresh, no long-term commitment, no lip funk. I have tried tons of the stuff, and nothing really worked for me until I tried CoverGirl Wetslicks.

I actually read about the stuff at Style Bakery in their Spring Beauty Trend Report and thought I would give it a try. It was cheaper than the other products they recommended to get the pale lip look, so why not.

My first color choice was Honey Talks – it's a light, fleshy color with a little glint to it. The color is fresh and trendy, and gives me that finished look I wanted. I liked it so much I went back and got Sugar Maple, which is darker than it looks on the CoverGirl site. It's like a sugared raisin color. I am now eyeing something with a little more pink in it, which is another color trend for Spring.

Wetslicks really does feel like lip balm, which makes it perfect for me, being a Chap Stick addict. It isn't high-maintenance, and you aren't making a 24 hour commitment to the color. Slick some on and see what you think.

April 13, 2007

Tips for an easy, good-looking home pedicure

After a long winter of neglect, my feet needed a little attention. Clomping around in winter boots and shoes made my heels hard and cracked, and my toenails, well, they were just scary. So, last weekend I took the time to give myself a pedicure.

Pedicures are one of life's little pleasures. Nothing makes you feel more pampered and pretty than smooth feet and polished tootsies. Back in the day, I loved to go with my girlfriend and have the pros take care of my feet, but these days I do it myself and save the money. I consider myself all thumbs when it comes to these things, but if I can do it, you can do it.

Here's how I do it.

1. The tools. Lay out your toenail clippers (the big kind that cut straight across), an orange wood stick, a large emery board, nail block, a pumice stone and a towel. You will also need polish remover, cotton balls, base/top coat, and your polish. Get it all assembled now to save time. I also consider a fashion magazine part of the routine – for me, it completes the pampering, spa-like experience.

2. The soak. If you have polish on your nails, remove it first. I start by soaking my feet in nice, warm water with some great-smelling bubble bath or shower gel. If you have one of those cool foot massage thingys, I am jealous. I just sit on the bathroom counter and soak my feet in the sink. While you're soaking one foot, pumice the other (heels, toes and the soles of your feet), then switch. Next, while soaking one foot, clean under nails and push your cuticles back on the other, then switch. After that, sometimes I use a scrubbing cleanser to get my feet super-soft. Take as much time with the soak as you like. Rinse and dry your feet, then apply lotion.


3. The shape. This can be the trickiest part, it was for me, but if you try this a few times, you will get it down pat. Find a comfortable way to sit so that you can easily reach your toes. I sit on a dining chair with my feet on the floor and just bend over at the waist. This position makes it easy for me to spread my toes out, so I don't need any cotton between them.

To start to shape the nails, trim them straight across – I like mine fairly short. Then take the emery board and shape your nails. The rule of thumb is to shape the nail to mirror the shape of your cuticle. Take your time on this part, because the final appearance depends a lot on the shape of the nail. Take your orange wood stick or cuticle pusher and just go around each nail to make sure that the cuticle is pushed back and the nails are immaculate.

Once you get the shape like you like, take your nail block and buff. This helps the base coat and polish adhere, and it also takes off any ridges so you get a nice, smooth look. Using a cotton ball and some polish remover, clean off the nails and let them dry.

4. The polish. Here's my top tip for making a home pedicure look professional – use lighter colors. With the darker shades, mistakes are more obvious. I use a pretty gold/apricot polish from Ulta that is not too light but not too dark.

Believe it or not, I put on a pair of thong sandals to complete this step. That way I can still (carefully) walk around while it dries and not worry about it. Start with one base coat, then read an article in your magazine while it dries. Apply one coat of color and let it dry while you read another article. Apply a second coat and let dry. I ALWAYS apply two coats of color, even with the lighter shades. I believe it makes for a longer-lasting pedi. Finally, apply a top coat.

Here are a few more tips I have learned from experience. With basically four coats on your nails, it takes time for them to cure and harden. Plan to do your pedicure early in the day so you are not going to bed right after – you may end up with sheet marks! The same applies with socks and shoes.

5. The final result. That's it! With just a little effort and some patience, you can give yourself a good-looking home pedicure that rivals a professional job. And with the money you saved you can get yourself that cute pair of sandals to show off your tootsies!

October 16, 2006

Hair color and shine booster, without all the trauma


I am hair handicapped. I have always struggled with hair styling products and appliances. Coloring my hair at home is entirely too traumatic for me and I would never attempt to add highlights on my own (think Bride of Frankenstein). So, I'm always on the lookout for products that are easy to use and give me a little confidence boost.

John Frieda® - Luminous Color Glaze™ may be the perfect product for someone like me. While you're still in the shower, you put it on your hair like conditioner, distributing it from roots to ends. Leave it on for three minutes, then rinse. That's it. No mixing. No gloves. No haz mat suit.

This isn't like a major transformation (which is perfect for me), it's just supposed to give your own color a little boost. The company claims that the color will build up over time, and they recommend using it at least three times a week. I have used it for two days now and my hair feels very silky and shiny and I notice today that my color is just a little richer somehow. It's a hair product with no trauma.

Let me know if you try it and how it works for you!

July 27, 2006

Bad hair days? Flatten them.


For me, hair styling has always been a hit-or-miss proposition. I have "accidentally good" hair days, but I can't seem to string them together because I can't remember what I did right. I recently embarked on a quest for no more bad hair days, hoping to use some new technology and some new product to come up with a system that works for me.

My first step was to upgrade a couple of personal care items in my drawer. First to go was the vintage blow dryer, in favor of a new one with ionic and ceramic technology. It was not a top of the line dryer by any means (it's a Vidal Sassoon one I got at Ulta for about $13), but combined with an ionic/ceramic brush (about $9), my hair is salon-soft.

While my hair was now as soft as I wanted it to be, it still had a mind of it's own. It flipped out on one side and in on the other. So, I went on a search for a new hair straightening iron. This is the one I picked up: the Conair Ultra Slim Straightener - CS4JCS for $17.99 at Walgreens. Unlike a little travel straightener I had used before, this one heats up in literally 60 seconds or less, it has really comfy handles and it stays consistently hot. I never had to hold the plates on any section of hair, rather I just slid the plates down the strands and got the effect I was looking for – hair that still has some bounce, but is controlled. I get consistent results in 5 minutes or less.

So, how will this work into my morning routine? I typically wrap my hair in a microfiber towel while I put on my makeup (see previous post), so by the time I get around to drying it, it’s just barely damp. I apply some straightening gel (currently using Paul Mitchell), and then clip my hair into sections and dry, starting with the back and bottom layers and working up. At this point I am not worrying about getting it straight, just getting it dry. Then, I plug in the straightener and tidy up for the 60 seconds it takes to heat up. I section my hair the same way and straighten. My goal is to control it, not to make it super-extra flat, so I am not spending a lot of time on any section.

Total time spent on my hair should now be in the 10-15 minute range. Not bad. And the bonus is that the time I save can be converted into sleep time!

July 21, 2006

Cool summer eyeshadow (literally), and mineral makeup that doesn't break the bank.

I am not a beauty product maven by any means, but occasionally I run across things that work pretty well for me. If you don't have an Ulta store near you, you can go to their website to find these (and lots more).

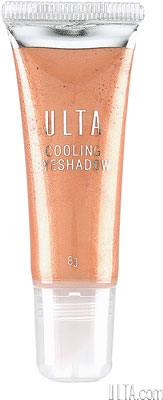
The first is called Cooling Eyeshadow. I haven't used a cream eyeshadow in years, so they must have been improved since... oh, say the 70s. It comes in three colors, Sunkist Pink, Bronze Shimmer, and Gold Glow. Pink shadow makes women my age look like we've been crying, so I chose the Gold Glow. It goes on with a slight "cooling" sensation, easily blends and all I need is a touch of liner and some mascara and it's a simple, less-than-five-minute look that I have been wearing all summer.


The second product is Ulta's own mineral makeup. I decided to try mineral makeup a while back, but I was very dubious at first. After all, they tell women of a certain age that powder tends to settle into fine lines, making us look older. Egad, anything but that. However, this type of makeup provides good coverage without any kind of heavy feeling and low and behold it's nothing like wearing powder. Bonus, the minerals are supposed to have some extra goodies like antioxidants that are actually said to improve the condition of the skin. I was a convert, but OUCH, the Bare Minerals I was using was pretty pricey, $25.

When I ran out of the Bare Minerals, I noticed that Ulta had come out with their own brand, and at $14, it was tempting. It came in fewer colors but one that matched what I was using so I grabbed it. What's the worst that could happen? I notice no real difference in the way the Ulta mineral makeup goes on, the coverage is the same and it feels as lightweight as the expensive stuff. I actually like the Ulta packaging better, because it has a transparent, domed lid, which is where I put the powder on the brush. It's not often you find something cheaper that works the way the expensive stuff does.

Both lines are available at Ulta, so you could try both yourself and see if you notice a difference. I will take the savings and go have myself a double-shot Brevé instead!